
Using Data from Custom Database Tables
This is an advanced guide that will be most useful for developers with experience with PHP and MySQL.
Overview
WPGraphQL makes use of core WordPress registries, such as the Post Type and Taxonomy registry, to generate the GraphQL Schema for your WordPress instance.
Since WordPress doesn’t have a formal “Custom Database Registry”, WPGraphQL is unable to programmatically expose data stored in custom database tables to the WPGraphQL Schema.
In this guide, we will look into how to use data from Custom Database Tables with WPGraphQL.
After reading this guide, you should be familiar with how WPGraphQL’s schema is designed, how WPGraphQL handles data, how to leverage WPGraphQL functions extend the WPGraphQL Schema, how to create custom Data Loaders and custom Connection Resolvers.
Thinking in Graphs
When it comes to adding support for custom database tables, it’s important to understand some conventions of GraphQL, and how WPGraphQL implements its Schema.
WPGraphQL treats WordPress data like an application data graph and follows the Relay Specification for GraphQL Schemas.
Any uniquely identifiable object is considered a “Node”.
In WordPress, that would mean a Post, a Page, a User, a Category, a Tag, a Media Item (attachment), etc.
Each Node can have properties, exposed in the GraphQL Schema as “fields”.
Each Node can also have “connections” to other nodes.
In GraphQL, Connections are a mechanism to facilitate relationships between Nodes. Either the relationship between an individual node and one or more nodes, or the relationship between the root of the graph and one or more nodes.
The image below helps visualize WordPress “Nodes” and “Connections” in an application data graph.
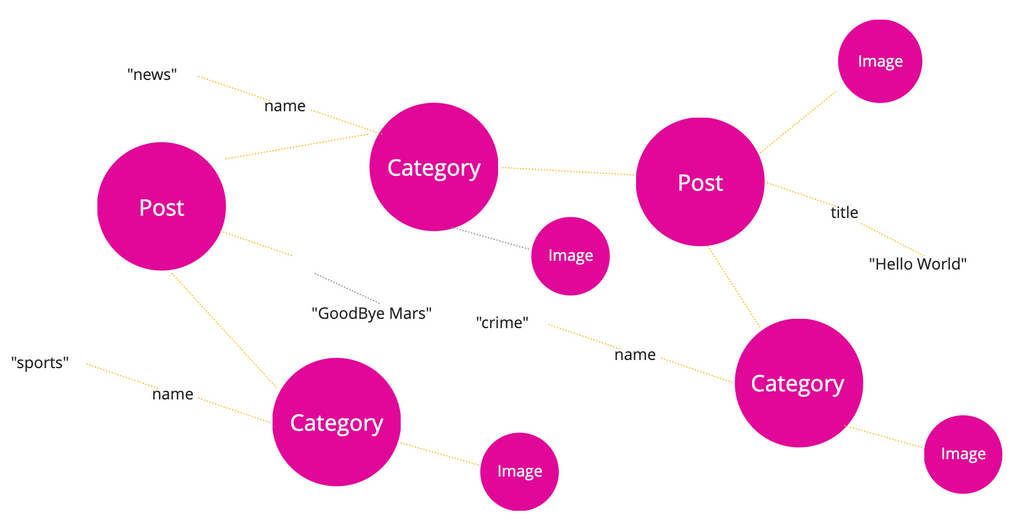
There are “Post” nodes and “Category” nodes, each node has fields and connections to other nodes.
GraphQL allows you to pluck nodes and fields out of the graph.
Below, we’ll look at how we can expose data stored in custom database tables to the GraphQL schema using the concepts of “Nodes” and “Connections”.
What we’re building
To put these concepts into action, we will be building a notifications system that stores messages associated with specific users. These notifications can be queried from the Root of the Graph, or in connection with the user that the notification is associate with.
This is a simple example that likely wouldn’t need a custom database table to accomplish, and is only intended to show the possibilities and concepts of using custom database tables with WPGraphQL. You will need to apply these concepts to your specific needs.
The final result will allow us to make GraphQL queries to get data out of a custom “notifications” table, like so:
query GetAllNotifications {
	notifications {
		nodes {
			__typename
			id
			message
			date
			user {
				node {
					__typename
					id
					name
				}
			}
		}
	}
}
or:
query GetCurrentUserNotifications {
	viewer {
		id
		name
		notifications {
			nodes {
				__typename
				id
				message
				date
			}
		}
	}
}
or:
query GetNotificationNode {
	node( id: "bm90aWZpY2F0aW9uOjE=" ) {
		__typename
		...on Notification {
			__typename
			id
			message
			date
		}
	}
}
If you want to skip ahead and see the final code, you can find it here: https://github.com/wp-graphql/wp-graphql-notifications-connection-example
Set up the Plugin
Create a new directory in your WordPress installations wp-content/plugins directory named wp-graphql-notifications-example.
Add a new file named wp-graphql-notifications-example.php and add the following:
<?php
/**
 * Plugin Name: WPGraphQL Notifications Example
 * Description: Example plugin showing how to use custom database tables with WPGraphQL
 * Version: 1.0
 * Author: Your Name
 */

// Prevent direct access
if (!defined('ABSPATH')) {
	exit;
}
This is the most basic code needed to create a WordPress plugin.
In the following sections we’ll add more code to this file to extend WordPress and WPGraphQL.
Creating Custom Database Table
If you already have a custom database table you’re working with, go ahead and skip to the next sections, and apply the concepts to your database structure.
Our goal is to be able to query a list of notifications, each with an ID, date, message and associated user.
Database Table Structure
Our database table will be structured as follows:
| Column | Type | Description |
|---|---|---|
| id | mediumint(9) | The primary key, auto-incremented |
| user_id | mediumint(9) | The ID of the user |
| message | text | The notification message |
| date | datetime | The date and time when the notification was created |
We can add the following code to our PHP file to create this database table for us when our plugin is activated:
Install the database table on plugin activation
The code below will execute when the plugin is activated, adding our custom database table. If your plugin is already active when you add this code, you will need to de-activate and re-activate to trigger the database table creation.
register_activation_hook( __FILE__, 'wpgraphql_notifications_example_create_notifications_table' );

function wpgraphql_notifications_example_create_notifications_table() {
		global $wpdb;
		$table_name = $wpdb->prefix . 'notifications';

		$charset_collate = $wpdb->get_charset_collate();

		$sql = "CREATE TABLE $table_name (
				id mediumint(9) NOT NULL AUTO_INCREMENT,
				user_id mediumint(9) NOT NULL,
				message text NOT NULL,
				date datetime DEFAULT CURRENT_TIMESTAMP NOT NULL,
				PRIMARY KEY  (id)
		) $charset_collate;"; // The space after primary key is important to avoid syntax errors

		require_once(ABSPATH . 'wp-admin/includes/upgrade.php');
		dbDelta($sql);
}
Inserting Data
Unlike Custom Post Types and Custom Taxonomies, our custom database table doesn’t have any Admin User Interfaces to interact with in the WordPress dashboard, and adding User Interfaces is beyond the scope of this tutorial.
You can use a database administration tool like TablePlus or Adminer if you’re using LocalWP and insert a few rows of data to the notifications table we created.
Or, you can use the following PHP snippet in your plugin file to insert some entries. This code will fire when you refresh any page in WordPress, so be sure you delete the code after it’s inserted the entries.
add_action( 'init', function() {

	global $wpdb;
	$table_name = $wpdb->prefix . 'notifications';

	// Sample data to be inserted
	$notifications = [
			['user_id' => 1, 'message' => 'Lorem ipsum dolor sit amet'],
			['user_id' => 1, 'message' => 'Consectetur adipiscing elit'],
			['user_id' => 1, 'message' => 'Sed do eiusmod tempor incididunt']
	];

	// Inserting the data
	foreach ($notifications as $notification) {
			$wpdb->insert(
					$table_name,
					array(
							'user_id' => $notification['user_id'],
							'message' => $notification['message'],
							'date'  => current_time('mysql') // WordPress function for current date-time
					),
					array(
							'%d', // user_id is an integer
							'%s', // message is a string
							'%s' // date is a string (formatted date)
					)
			);
	}
} );
With some dummy data in the custom table table, we can move on to exposing the data to the GraphQL Schema.
Registering the Node Type
The WPGraphQL Schema centers around “Nodes” and “Connections”.
We will apply these concepts by adding the Notifications to the Graph as “Nodes” that have “Connections” from the Root of the Graph and “Connections” to/from the associated user the notification is assigned to.
The following code will register the Notification GraphQL Object Type to the GraphQL Schema.
NOTE: Type names must be unique across the Schema. The more explicit you name a Type, the more self-documenting it becomes and the less likely it will conflict with future Types in the Schema.
// Hook into WPGraphQL as it builds the Schema
add_action( 'graphql_register_types', 'wpgraphql_notifications_example_register_types' );

function wpgraphql_notifications_example_register_types() {

	// Register the GraphQL Object Type to the Schema
	register_graphql_object_type( 'Notification', [
		// Be sure to replace your-text-domain for i18n of your plugin
		'description' => __( 'Notification messages for a user', 'your-text-domain' ),
		// By implementing the "Node" interface the Notification Object Type will automatically have an "id" field.
		// By implementing the "DatabaseIdentifier" interface, the Notification Object Type will automatically have a "databaseId" field
		'interfaces' => [ 'Node', 'DatabaseIdentifier' ],
		// The fields that can be queried for on the Notification type
		'fields' => [
			 'id' => [
				 'resolve' => function( $source ) {
						return base64_encode( 'notification', $source->id );
				 }
			 ],
			 'userDatabaseId' => [
				 'type' => 'Int',
				 'description' => __( 'The databaseId of the user the message belongs to', 'your-text-domain' ),
			 ],
			 'message' => [
				 'type' => 'String',
				 'description' => __( 'The notification message', 'your-text-domain' ),
			 ],
			 'date' => [
				 'type' => 'String',
				 'description' => __( 'The date the message was created', 'your-text-domain' ),
			 ],
		]
	] );

}
The “Notification” Object Type is now registered to the GraphQL Schema, however if you search the Schema using the GraphiQL IDE, you won’t see the Type in the Schema.
This is because there are no fields in the Schema that return the Notification Type.
Let’s fix that.
Registering a Root Connection
We want to be able to query a list of “Notification” nodes from the root of the Graph.
By registering a GraphQL Connection, we will get a lot of features, with minimal effort.
The following code will generate several GraphQL Types in the Schema, allowing us to now find the “Notification” Type in the GraphQL Schema, and allow us to query for lists of “Notification” nodes.
Within the wpgraphql_notifications_example_register_types function, add the following code:
register_graphql_connection([
	// The GraphQL Type that will have a field added to it to query a connection from
	'fromType' => 'RootQuery',
	// The GraphQL Type the connection will return Nodes of. This type MUST implement the "Node" interface
	'toType' => 'Notification',
	// The field name to represent the connection on the "from" Type
	'fromFieldName' => 'notifications',
	// How to resolve the connection. For now we will return null, but will visit this below.
	'resolve' => function( $root, $args, $context, $info ) {
		// we will revisit this shortly
		return null;
	}
]);
Now, if you refresh the GraphiQL IDE and search for “Notification” again, you should see it. This is because there is now field (notifications) that returns a Connection to the Notification Type.
You should now be able to execute the following query and it would be a valid, without throwing any errors:
query GetAllNotifications {
	notifications {
		nodes {
			__typename
			id
			message
			date
		}
	}
}
While it doesn’t return errors, it also doesn’t return data. This is because we left the resolve function as return null;.
Let’s move on to fixing that so we can resolve data from the custom database Table.
Creating a Notification Loader
Under the hood, WPGraphQL uses a Loader concept, where we centralize logic regarding how WPGraphQL should load data.
In an application Data Graph, nodes can be accessed from many different entry points, such as the Root of the Graph or connections from various other Types of node, so a Loader concept reduces duplicate code for fetching objects.
Let’s create a “Notification” loader and register it to WPGraphQL.
In our PHP file we can add the following:
add_action( 'graphql_init', function() {

	/**
	 * Class NotificationLoader
	 *
	 * This is a custom loader that extends the WPGraphQL Abstract Data Loader.
	 */
	class NotificationLoader extends \WPGraphQL\Data\Loader\AbstractDataLoader {

		/**
		 * Given an array of one or more keys (ids) load the corresponding notifications
		 *
		 * @param array $keys Array of keys to identify nodes by
		 *
		 * @return array
		 */
		public function loadKeys( array $keys ): array {
			if ( empty( $keys ) ) {
				return [];
			}

			global $wpdb;

			// Prepare a SQL query to select rows that match the given IDs
			$table_name = $wpdb->prefix . 'notifications';
			$ids				= implode( ', ', $keys );
			$query			= $wpdb->prepare( "SELECT * FROM $table_name WHERE id IN ($ids) ORDER BY id ASC", $ids );
			$results		= $wpdb->get_results($query);

			if ( empty( $results ) ) {
				return [];
			}

			// Convert the array of notifications to an associative array keyed by their IDs
			$notificationsById = [];
			foreach ( $results as $result ) {
				// ensure the notification is returned with the Notification __typename
				$result->__typename = 'Notification';
				$notificationsById[ $result->id ] = $result;
			}

			// Create an ordered array based on the ordered IDs
			$orderedNotifications = [];
			foreach ( $keys as $key ) {
				if ( array_key_exists( $key, $notificationsById ) ) {
					$orderedNotifications[ $key ] = $notificationsById[ $key ];
				}
			}

			return $orderedNotifications;

		}
	}

	// Add the notifications loader to be used under the hood by WPGraphQL when loading nodes
	add_filter( 'graphql_data_loader_classes', function( $loaders ) {
		$loaders['notification'] = NotificationLoader::class;
		return $loaders;
	}, 10, 1 );

	// Filter so nodes that have a __typename will return that typename
	add_filter( 'graphql_resolve_node_type', function( $type, $node ) {
		return $node->__typename ?? $type;
	}, 10, 2 );

});
This adds a NotificationLoader class, extending the WPGraphQL AbstractDataLoader class.
This tells WPGraphQL how to resolve data of the Notification Type when it’s being asked for given 1 or more IDs.
Then, using the graphql_data_loader_classes filter, we let WPGraphQL know about our new custom NotificationLoader so that it can be used when resolving data.
And last, using the graphql_resolve_node_type filter, we allow the notifications __typename property to determine which type of node to return.
Now, as long as you have a notification in the database with id 1, you should be able to execute the following query and get a result:
query GetNotificationNode {
	node( id: "bm90aWZpY2F0aW9uOjE=" ) {
		__typename
		...on Notification {
			__typename
			id
			message
			date
		}
	}
}
Creating a Connection Resolver Class
We’re able to query for an individual Notification node by ID now, however we’re still getting null results if we query for the notifications connection.
We need to have the connection resolver return something other than null.
WPGraphQL has an AbstractConnectionResolver that helps facilitate resolving connections.
You can see all the ConnectionResolvers in core WPGraphQL here: https://github.com/wp-graphql/wp-graphql/tree/develop/src/Data/Connection
Let’s define a NotificationConnectionResolver class to help resolve connection queries for Notifications.
Add the following code to the php file:
add_action( 'graphql_init', function() {

	class NotificationConnectionResolver extends \WPGraphQL\Data\Connection\AbstractConnectionResolver {

		// Tell WPGraphQL which Loader to use. We define the `notification` loader that we registered already.
		public function get_loader_name(): string {
			return 'notification';
		}

		// Get the arguments to pass to the query.
		// We're defaulting to an empty array as we're not supporting pagination/filtering/sorting in this example
		public function get_query_args(): array {
			return [];
		}

		// Determine the query to run. Since we're interacting with a custom database Table, we
		// use $wpdb to execute a query against the table.
		// This is where logic needs to be mapped to account for any arguments the user inputs, such as pagination, filtering, sorting, etc.
		// For this example, we are only executing the most basic query without support for pagination, etc.
		// You could use an ORM to access data or whatever else you like here.
		public function get_query(): array|bool|null {
			global $wpdb;
			$current_user_id = get_current_user_id();

			$user_id = $this->query_args['user_id'] ?? $current_user_id;

			$ids_array = $wpdb->get_results(
				$wpdb->prepare(
					sprintf(
						'SELECT id FROM %1$snotifications WHERE user_id=%2$d LIMIT 10',
						$wpdb->prefix,
						$user_id
					)
				)
			);

			return ! empty( $ids_array ) ? array_values( array_column( $ids_array, 'id' ) ) : [];
		}

		// This determines how to get IDs. In our case, the query itself returns IDs
		// But sometimes queries, such as WP_Query might return an object with IDs as a property (i.e. $wp_query->posts )
		public function get_ids(): array|bool|null {
			return $this->get_query();
		}

		// This allows for validation on the offset. If your data set needs specific data to determine the offset, you can validate that here.
		public function is_valid_offset( $offset ): bool {
			return true;
		}

		// This gives a chance to validate that the Model being resolved is valid.
		// We're skipping this and always saying the data is valid, but this is a good
		// place to add some validation before returning data
		public function is_valid_model( $model ): bool {
			return true;
		}

		// You can implement logic here to determine whether or not to execute.
		// for example, if the data is private you could set to false if the user is not logged in, etc
		public function should_execute(): bool {
			return true;
		}

	}

});
This creates a NotificationConnectionResolver class, extending the \WPGraphQL\Data\Connection\AbstractConnectionResolver class.
The code comments should help clarify how to customize the class and add support for more advanced, production use cases.
Now, we need to implement this resolver.
In our register_graphql_connection() that we already added, let’s replace the resolve function with the following:
'resolve' => function( $root, $args, $context, $info ) {
		// we will revisit this shortly
		$resolver = new NotificationConnectionResolver( $root, $args, $context, $info );
		return $resolver->get_connection();
}
Now, our connection isn’t returning null, it’s returning the results of the NotificationConnectionResolver.
We can now query the following, and we should see results:
query GetAllNotifications {
	notifications {
		nodes {
			__typename
			id
			message
			date
		}
	}
}
Registering Connections to other Nodes
Let’s now take a look at how to register a connection between the Notification type and the User Type.
Notifications each have 1 user ID, so we want a One-to-One connection between a Notification and the related user.
With the following snippet added just below our other register_graphql_connection(), we can register a connection from the Notification Type to the User type:
register_graphql_connection([
	'fromType' => 'Notification',
	'toType' => 'User',
	'fromFieldName' => 'user',
	'oneToOne' => true,
	'resolve' => function( $root, $args, $context, $info ) {
		$resolver = new \WPGraphQL\Data\Connection\UserConnectionResolver( $root, $args, $context, $info );
		$resolver->set_query_arg( 'include', $root->user_id );
		return $resolver->one_to_one()->get_connection();
	}
]);
Let’s also add a Connection from the User to the Notification:
register_graphql_connection([
	'fromType' => 'User',
	'toType' => 'Notification',
	'fromFieldName' => 'notifications',
	'oneToOne' => true,
	'resolve' => function( $root, $args, $context, $info ) {
		$resolver = new NotificationConnectionResolver( $root, $args, $context, $info );
		$resolver->set_query_arg( 'user_id', $root->ID );
		return $resolver->one_to_one()->get_connection();
	}
]);
Now, all 3 of the queries we set out to have work are working with data from our custom database table:
query GetAllNotifications {
	notifications {
		nodes {
			__typename
			id
			message
			date
			user {
				node {
					__typename
					id
					name
				}
			}
		}
	}
}
or:
query GetCurrentUserNotifications {
	viewer {
		id
		name
		notifications {
			nodes {
				__typename
				id
				message
				date
			}
		}
	}
}
or:
query GetNotificationNode {
	node( id: "bm90aWZpY2F0aW9uOjE=" ) {
		__typename
		...on Notification {
			__typename
			id
			message
			date
		}
	}
}